by Matt Bush, on Aug 14, 2019 5:27:51 PM
One of the questions I have been asked several times is how to use installation variables to store poses for the robot to use in multiple programs. The reason for wanting to do this can vary but one of the main reasons that we have seen is the need to have multiple programs reference the same point and being able to touch it up from one location and affecting all programs where the variable is used. So the first question is why not simply use Features, that is what Universal Robots intended them to be used for. The issue that we have seen with Features is that they are hard to touch up as you have to be able to access the installation file to which in many companies requires a programmer to do since the files are password protected. But what if you need to give your operator access to easily update points but don’t want them to have access to the actual program or installation files? With this method, you can give your operators the ability to update points using a simple program that assigns the points to the installation file using installation variables. This way, the program remains locked down from being edited while giving operators the flexibility they need to touch up points when the need arises.
To demonstrate how to do this I created two simple programs, the first called “createPoses” which places the Universal Robots UR5 into free-drive mode allowing the operator to move the robot freely with their hands and then prompt them to teach two positions using a popup message. The second program is called “usePoses” and uses the two poses that were just taught along with a 3rd point that is hard coded into the program. Let’s get started.
I am using a CB3 UR5 for this demonstration but the same method works on the E-Series robots, the program was tested on one in our lab as well just to ensure it worked the same.
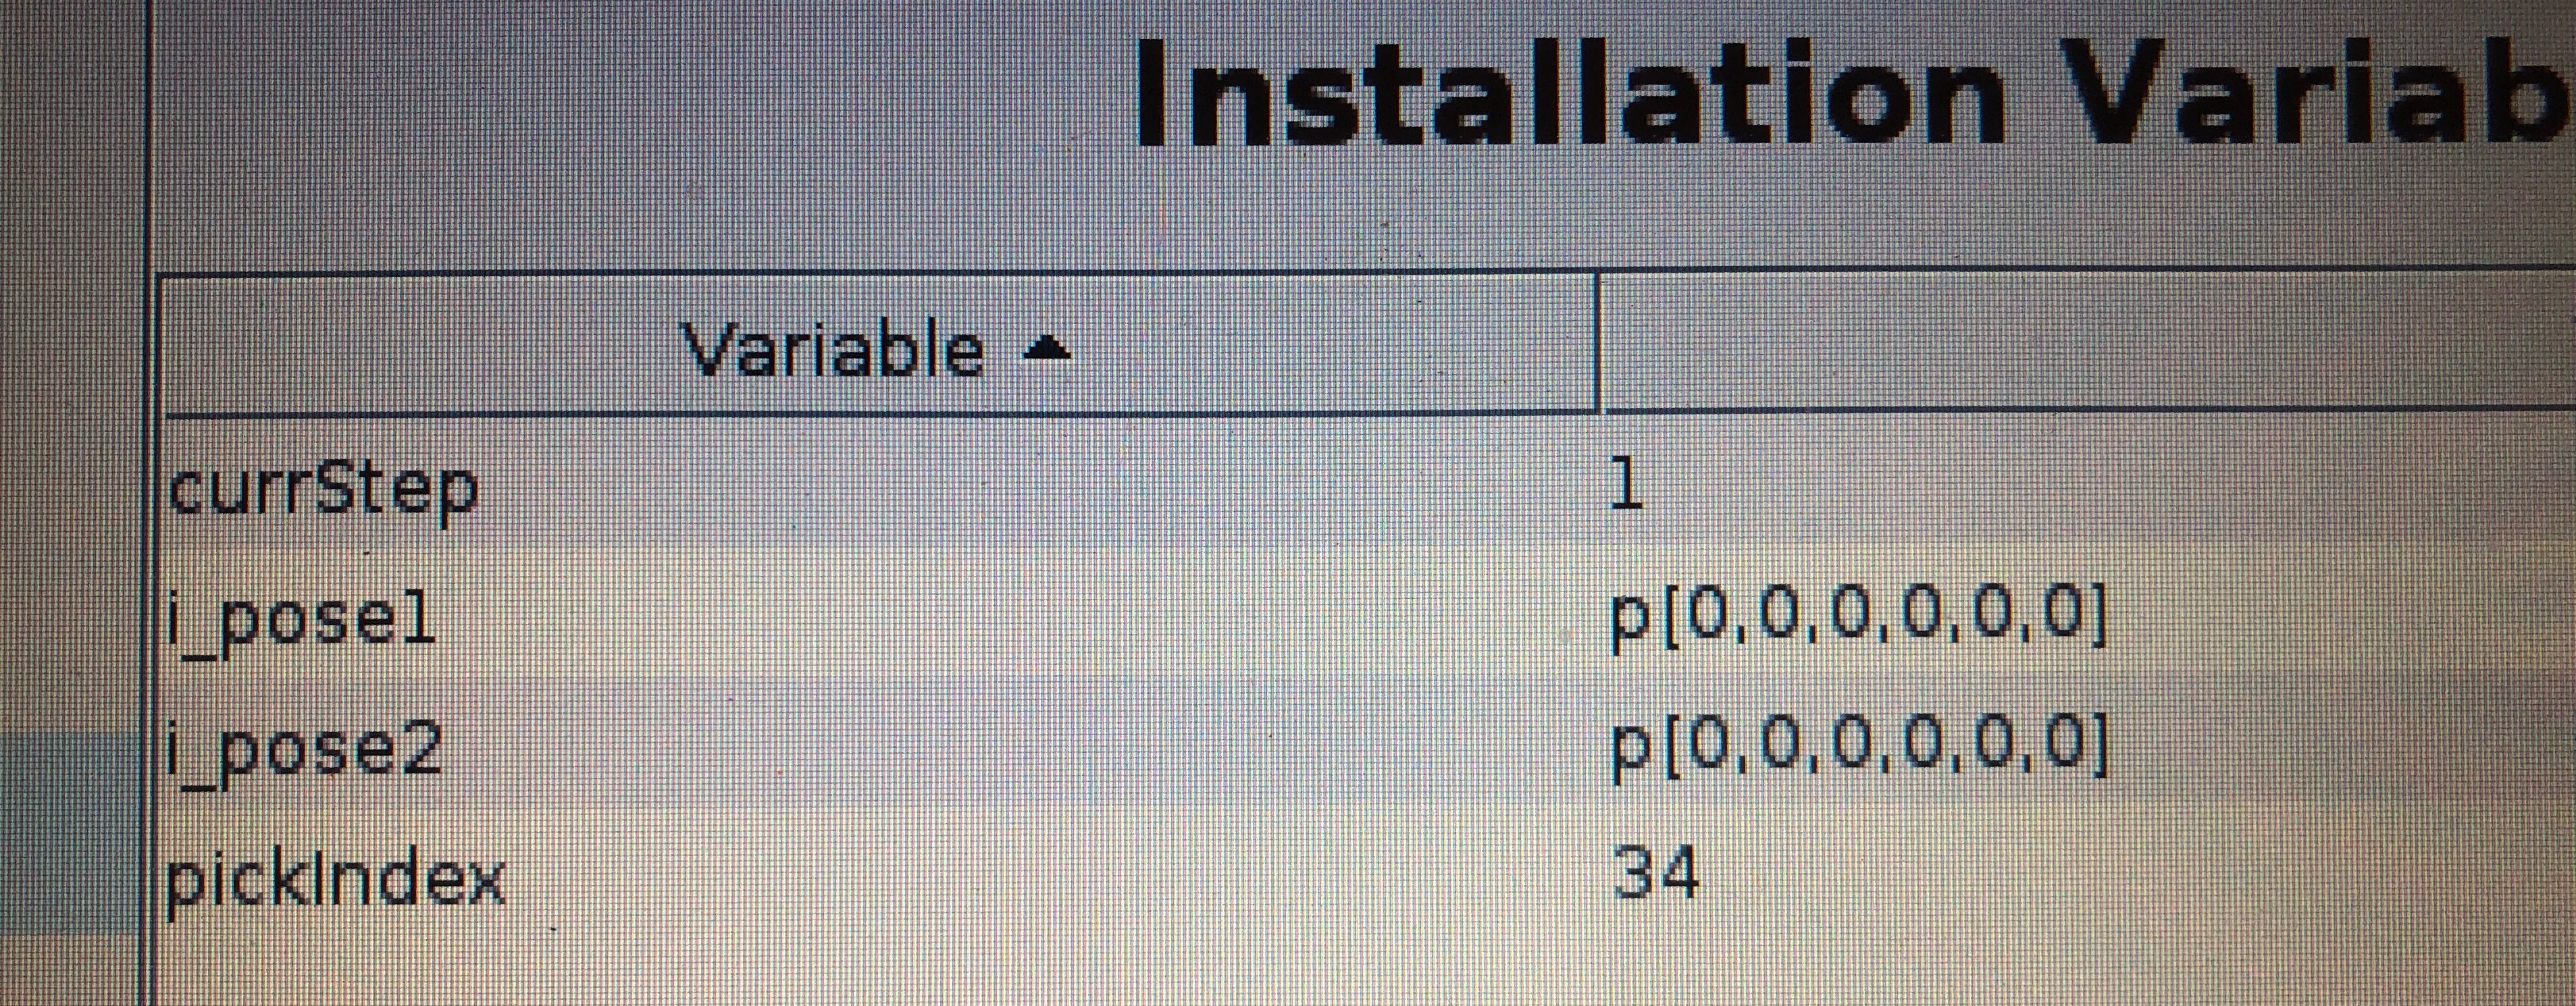
Create the Installation Variables
The first step is to create two new installation variables and assign them an initial pose. For this example I called the variables, i_pose1 and i_pose2 and assigned them the starting pose of p[0,0,0,0,0,0].
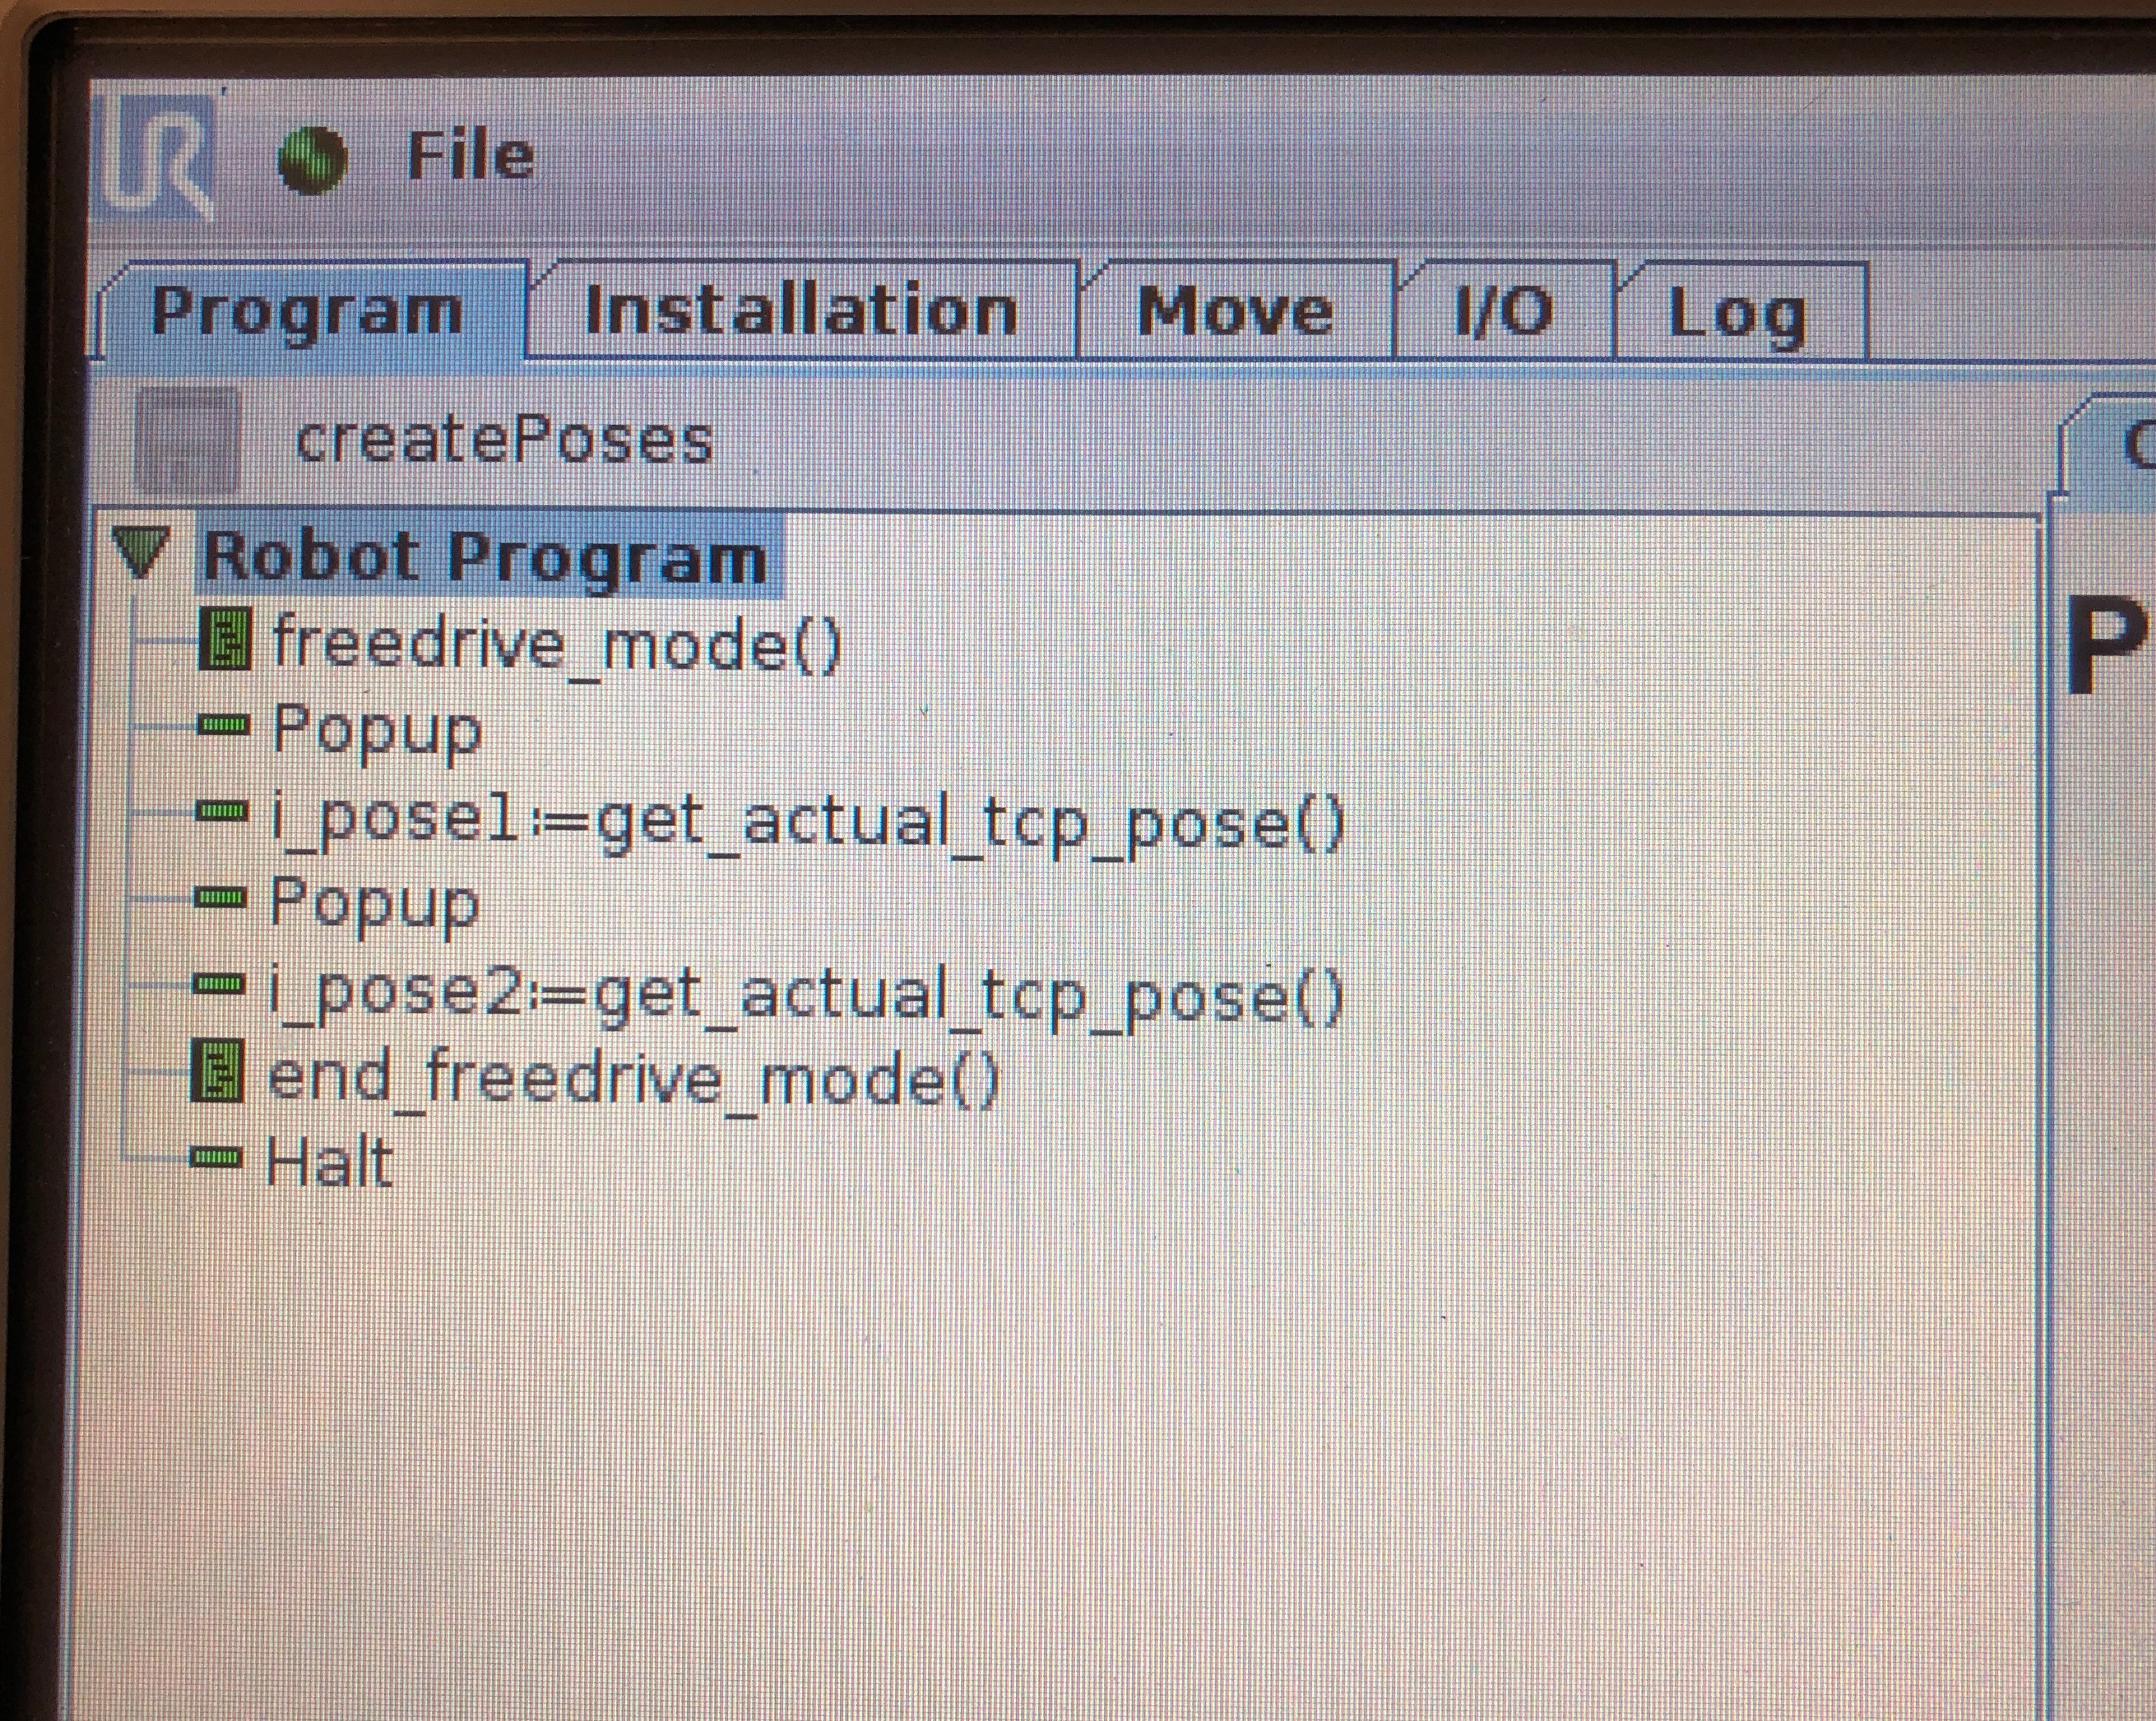
Create the Program for Capturing Points
The create pose program uses a script command to place the robot into free drive and then two popups to prompt the user to teach two poses and then the program exits free-drive and halts the program. After each of the popup messages I assign the current tcp pose to one of the two installation variables
Create the Program for Using the Points
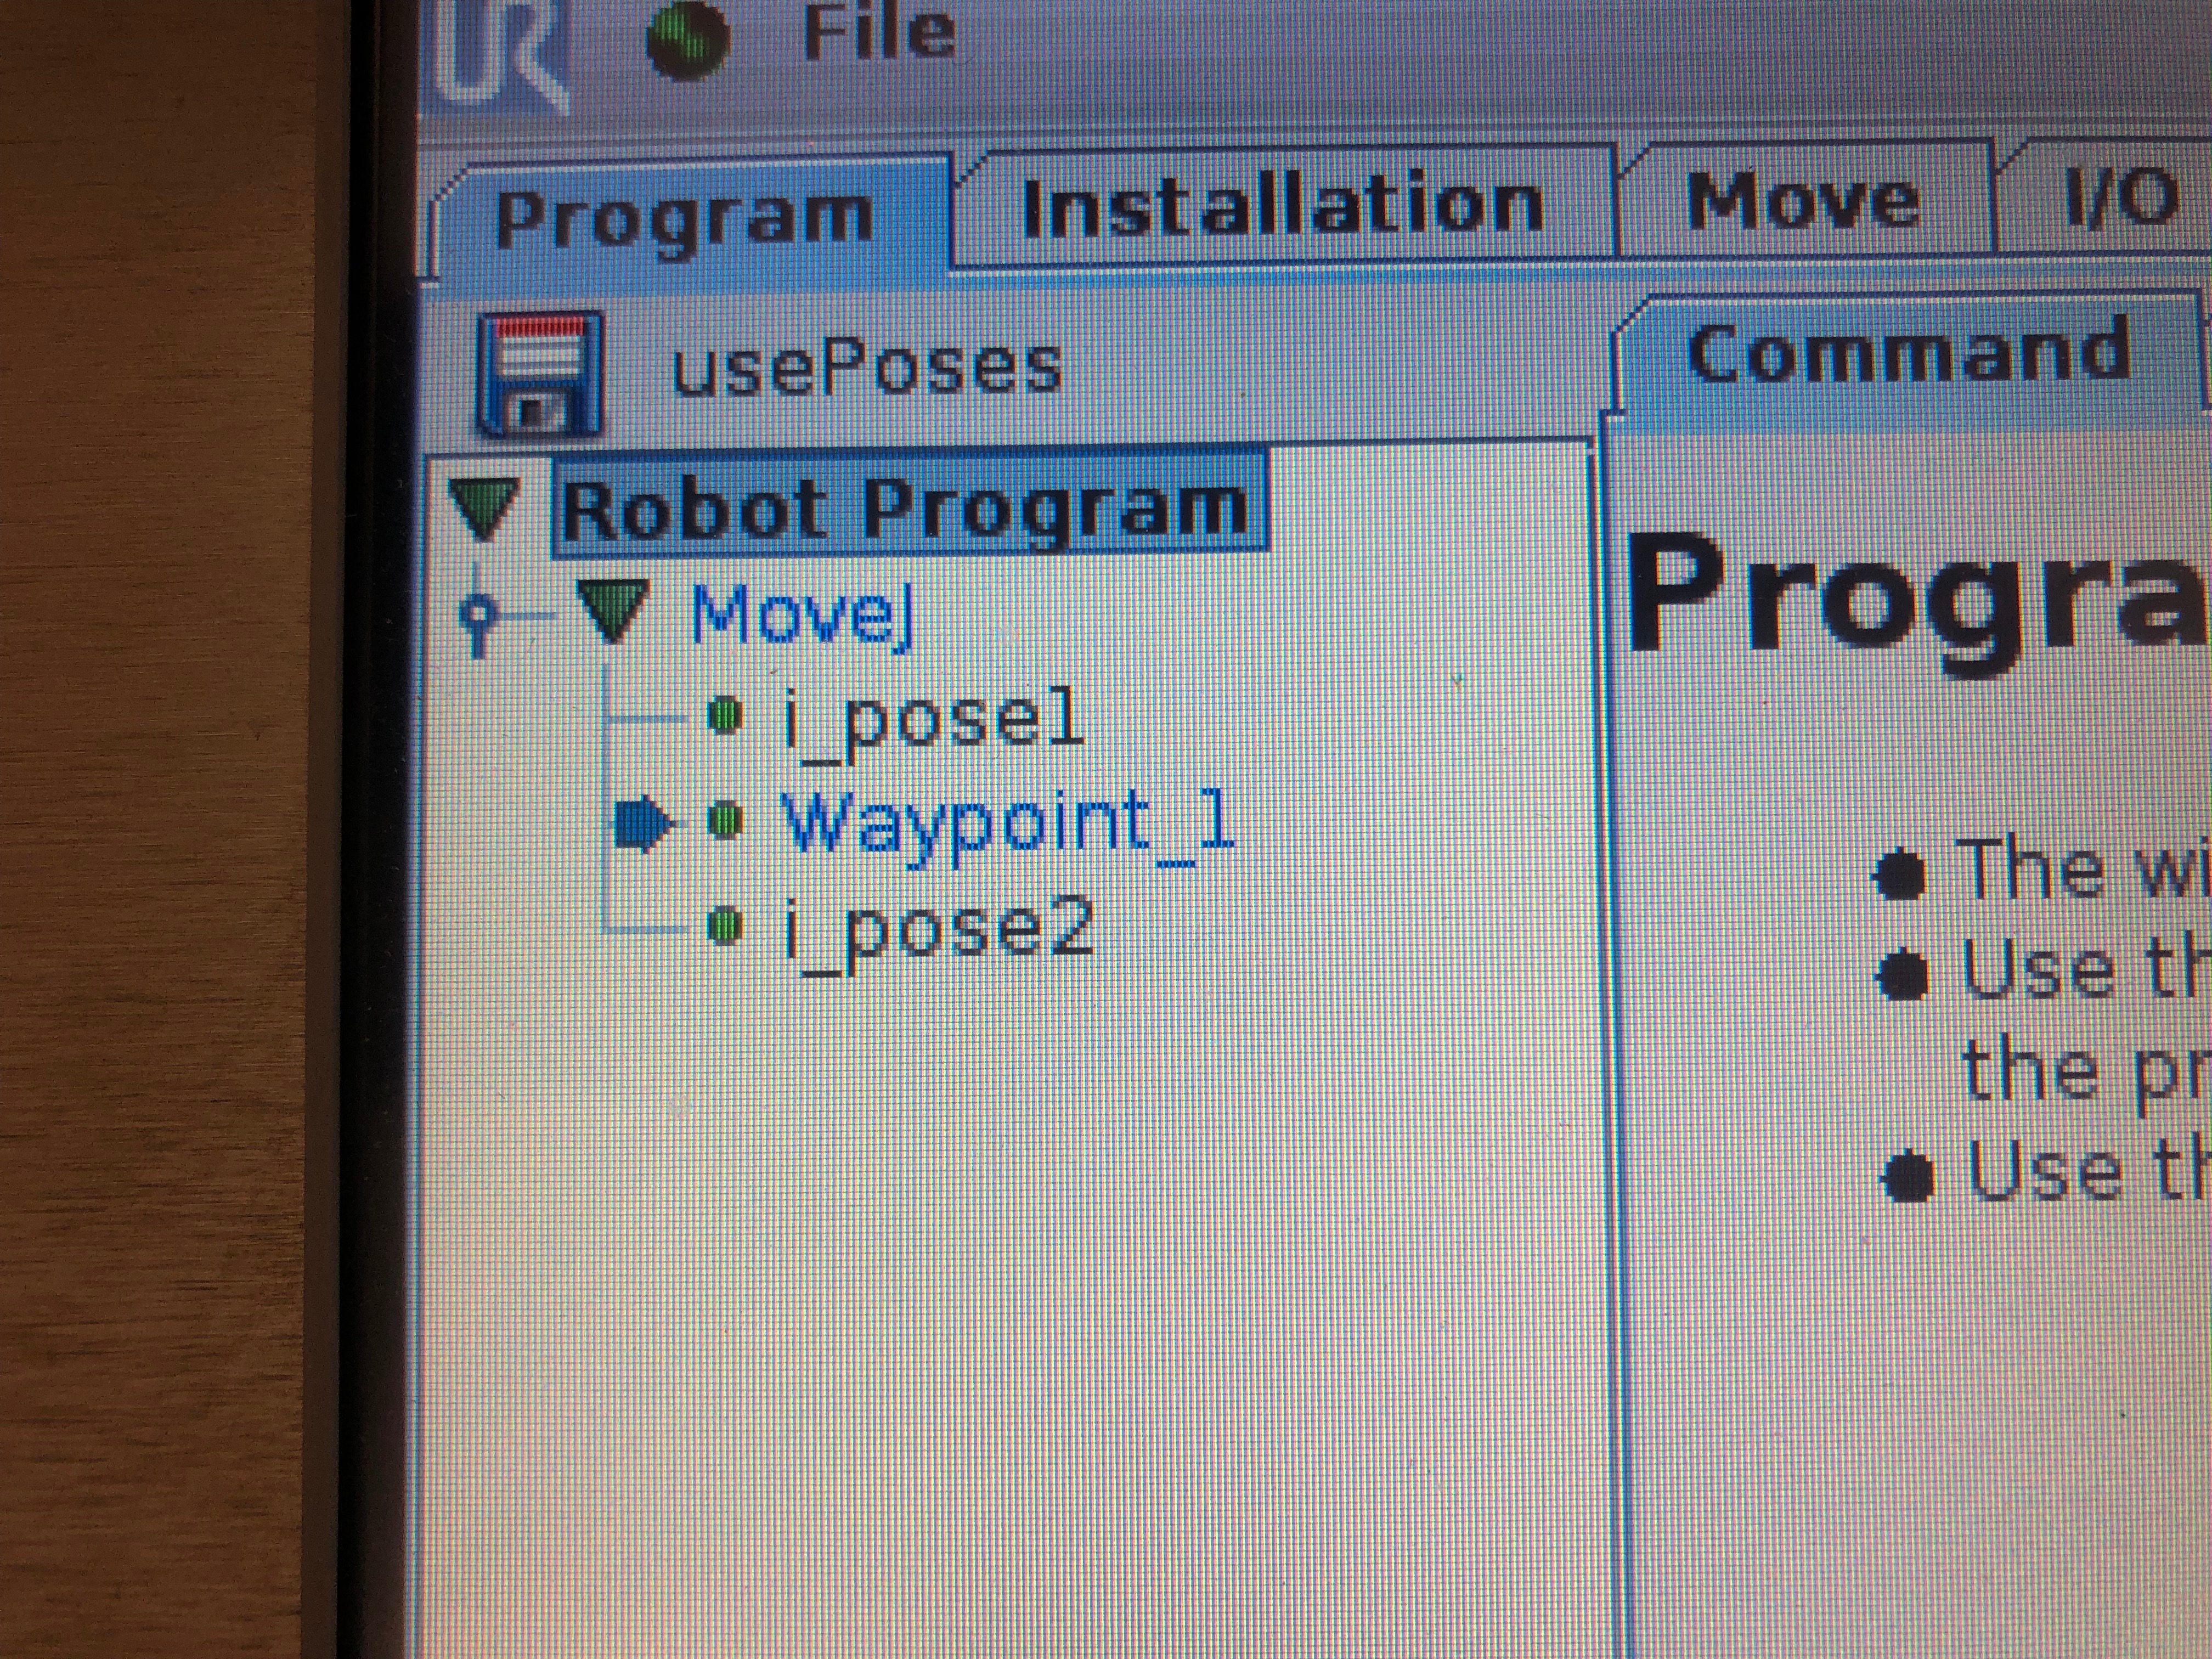
Once that program is created, create another program that we will call “usePoses”. The program for this example will use a single MoveJ command with 3 waypoints under it, 2 variable and 1 taught. The first waypoint is our i_pose1 variable, the second waypoint is a taught waypoint in Polyscope and the third waypoint is our i_pose2 variable.
Now that you have the two programs created that we need for the demo, open up the “createPoses” program and press play. You can move the robot to the 1st position you want to teach and press continue on the popup, move the arm to the second position and press continue once more and then the program will stop.
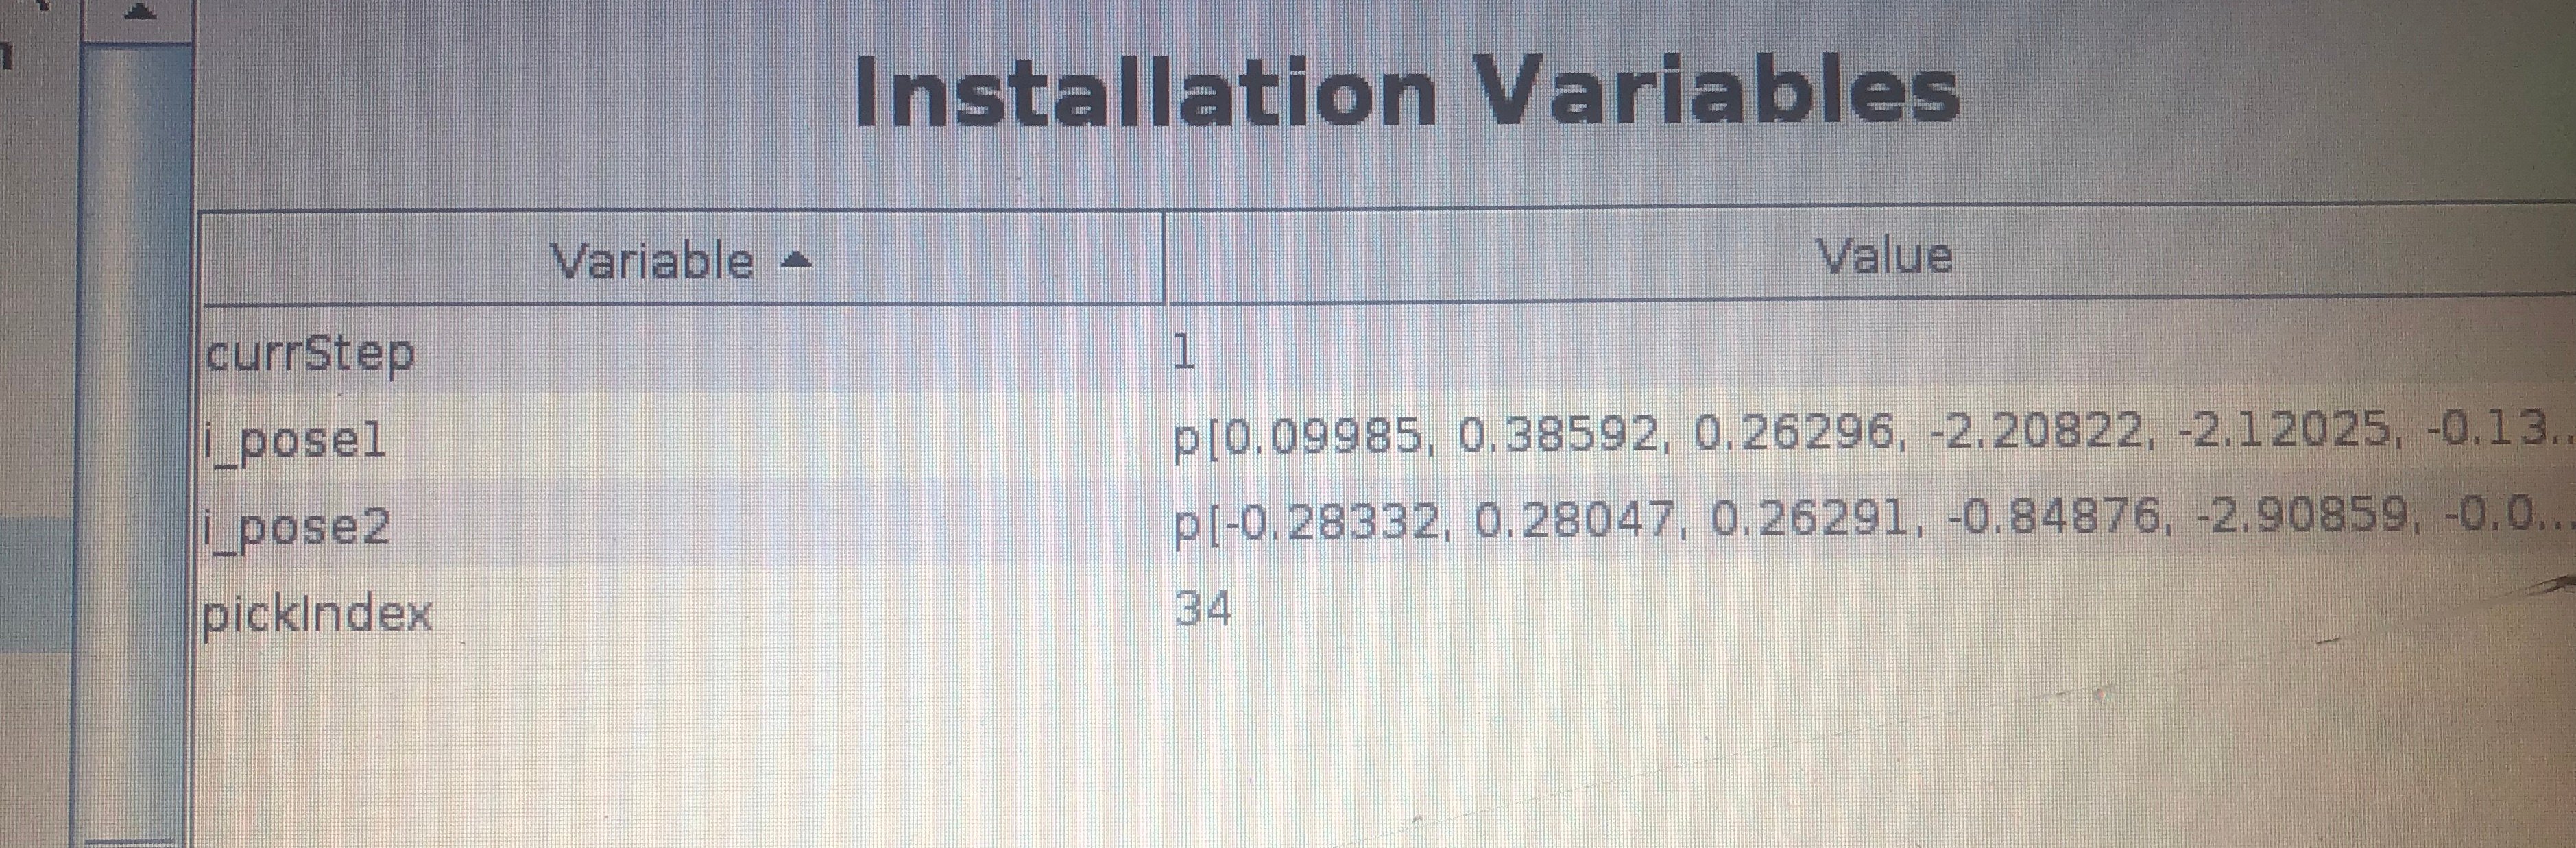
Now that the positions are taught you could verify that data is now being stored in the installation file by going back to the installation tab and going to the Variables sub-menu. You should now see poses that are from the previous program not the original p[0,0,0,0,0,0] placeholder that we used when we created the variables.
Open the “usePoses” program and press play. You should see the arm execute the following sequence. Once complete is will repeat all steps.
<current position> -> i_pose1
i_pose1 -> <taught position>
<taught position> -> i_pose2
That is all that is needed to create features that your operators can easily update at anytime by using the robot and a program where they can freely move the arm into position and have the robot learn the new position.
BONUS
You may have noticed that with our “usePoses” program that you did not have to move the arm using the AUTO button to the first waypoint of the program when you pressed play . That is a hidden secret with Universal Robots that if you have a variable position as the first position in a program that you are able to just press play and the robot will find its way to that first position automatically. So in your normal programs you can always put a variable position in the “Before Start” section and not have to use the AUTO button to start the program. We create a variable called “currPose” and assign the current tcp pose to that variable and then use it as a variable waypoint in a MoveJ command.
CAUTION!
Word of Caution, the robot does not know that there are potentially obstacles between the current position and the first point in the program so make sure that the arm is clear of obstructions before using this method.
I hope that this guide helped you understand how to create simple to update feature points using Universal Robots programming. Stay tuned for more information and let me know if there is a topic that you would like to have covered.